Protecting AWS CloudFront site from prying eyes
In this article, we focus on protecting frontend applications deployed to AWS CloudFront, primarily test/sandbox environments and pre-launch production sites that might already have their own authentication. Our goal is to secure these applications with an add-on security mechanism that can be easily added and removed, without requiring network configuration changes, IP whitelists, or WAF modifications.
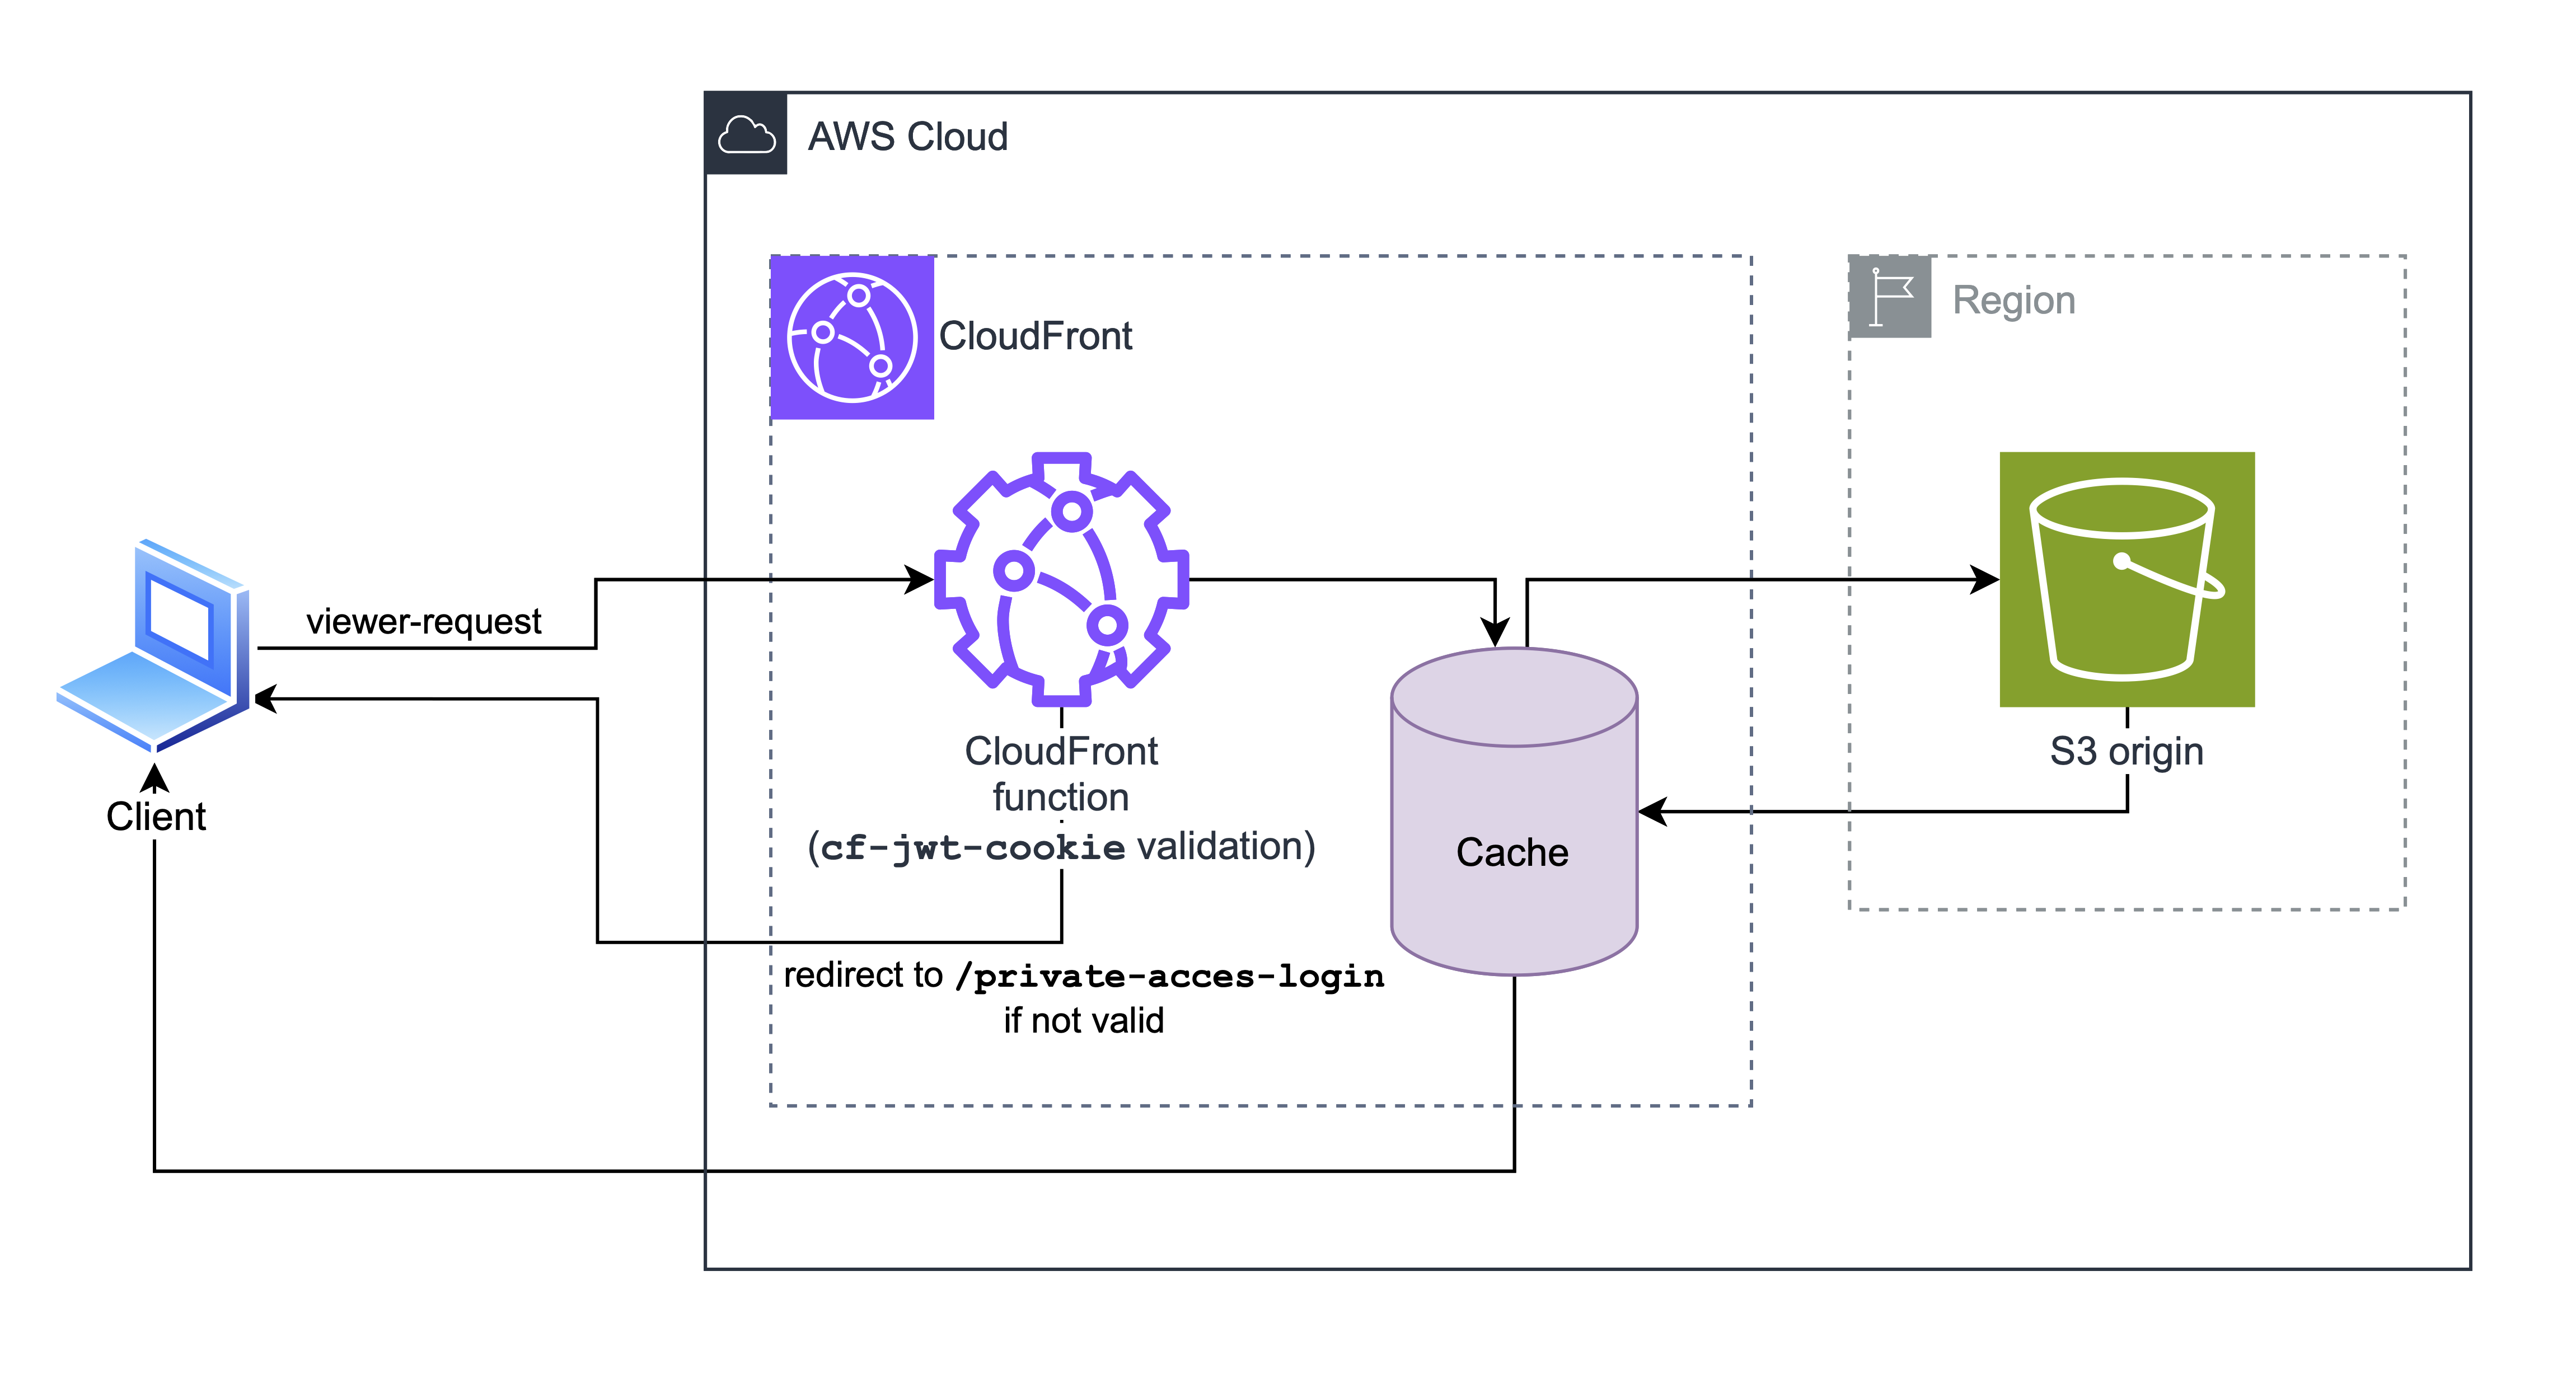
AWS CloudFront is Amazon's CDN offering that is very often used to host single-page applications (SPAs). SPA files reside in an S3 bucket, and CloudFront serves them to customers. In some cases, you might want to hide these sites. For example, test and sandbox versions of the site that contain not-yet-released features and bugs might be better hidden from the public internet.
There are some ways to prevent access by combining VPN and AWS WAF (Web Application Firewall), but that requires routing all traffic through VPN and makes the site slower than if it was served by CloudFront's edge location.
In this article, we'll describe an approach that will make content inaccessible to anyone without specific login credentials or (optionally) access to the internal network.
We'll be using AWS SAM CLI to deploy CloudFormation with the following resources:
- AWS CloudFront
- CloudFront functions
- Private AWS REST API Gateway for internal network & VPC Endpoint
We'll assume your VPC is already set up, but you can use the sample CloudFormation template to set up the whole environment.
The main part of the solution is using CloudFront function to validate JWT which has a nice balance between security and speed.
While we could use a service worker to inject a CloudFront JWT Token, we'll be using cookies and will leave service workers as a topic for another article.
What we want
- We want public internet users who stumble upon our not-yet-ready-to-be-seen site to be greeted with a login screen and should not even be able to load SPA resources such as HTML, JavaScript, or images and get some glimpse of what is hiding there.
- Our internal users in the internal network should be able to visit the URL and use and test the site normally without any additional hassle.
- Our external users that need access to the site but don't have access to the internal network should be given credentials, and after successfully logging in, should have unlimited access for a while (7 days in our case).
This protection should not introduce any performance penalty after the user has been granted access.
1: Random internet user
When the user visits the protected site, they are shown a login page and cannot proceed or access any of the static assets even when inspecting the HTML page source or manipulating the URL directly. We do this by checking the the incoming request has a cookie named cf-jwt-cookie with JWT value and then verifying the JWT signature. Only if the signature is valid, we'll allow CloudFront to load the assets. Otherwise, the login screen will just show an invalid username or password error. The login page and mechanism are application-specific and could be as simple as hashed user/password stored in the frontend (not recommended) or as complex as a SAML-based solution.
2: External user with credentials
When the user without access to the internal network visits the protected site, the login screen will be shown. The user will enter credentials that will be sent to an open endpoint, and that endpoint must return a valid JWT when credentials are valid so that the frontend can store JWT value in the cf-jwt-cookie cookie.
Enabling protection
We'll start with an AWS SAM CloudFormation template that creates an S3 bucket that will serve as a CloudFront origin and a CloudFront distribution. We'll also add some files that we want to protect.
S3Bucket:
  Type: AWS::S3::Bucket
  Properties:
    BucketName: !Sub cpa-${EnvironmentName}-bucket

S3BucketPolicy:
  Type: AWS::S3::BucketPolicy
  Properties:
    Bucket: !Ref S3Bucket
    PolicyDocument:
      Version: "2012-10-17"
      Statement:
        - Effect: Allow
          Principal:
            Service: "cloudfront.amazonaws.com"
          Action: "s3:GetObject"
          Resource: !Sub "${S3Bucket.Arn}/*"
          Condition:
            StringEquals:
              AWS:SourceArn: !Sub "arn:aws:cloudfront::${AWS::AccountId}:distribution/${CloudFrontDistribution}"

CloudFrontOriginAccessControl:
  Type: AWS::CloudFront::OriginAccessControl
  Properties:
    OriginAccessControlConfig:
      Description: "Origin access control(OAC) for allowing cloudfront to access S3 bucket"
      Name: !Sub cpa-origin-access-control-${EnvironmentName}
      OriginAccessControlOriginType: s3
      SigningBehavior: always
      SigningProtocol: sigv4

CloudFrontDistribution:
  Type: AWS::CloudFront::Distribution
  DependsOn:
    - S3Bucket
  Properties:
    DistributionConfig:
      Origins:
        - DomainName: !GetAtt S3Bucket.RegionalDomainName
          Id: !Sub "cpa-${EnvironmentName}-s3-origin"
          S3OriginConfig:
            OriginAccessIdentity: ""
          OriginAccessControlId: !GetAtt CloudFrontOriginAccessControl.Id
      Enabled: true
      DefaultRootObject: index.html
      CustomErrorResponses:
        - ErrorCode: 404
          ResponseCode: 200
          ResponsePagePath: /index.html
        - ErrorCode: 403
          ResponseCode: 200
          ResponsePagePath: /index.html
      HttpVersion: http2
      DefaultCacheBehavior:
        AllowedMethods:
          - GET
          - HEAD
          - OPTIONS
        Compress: true
        TargetOriginId: !Sub "cpa-${EnvironmentName}-s3-origin"
        ForwardedValues:
          QueryString: false
          Cookies:
            Forward: all
        ViewerProtocolPolicy: redirect-to-https
        FunctionAssociations:
          - EventType: viewer-request
            FunctionARN: !Ref ExtractAccessCookieCloudfrontFunction
Note that we configured CloudFront to use S3 as an origin without exposing S3 content to public. This means that CloudFront is the only way to access files stored on S3. If we prevent access through CloudFront, we fully prevent access to files by the public.
Now, let's add protection, we'll add CloudFront function code that checks if JWT token we received is valid. Note that javascript supported by CloudFront functions is severly limited, see list of limitation and features here. Another gotcha is that CloudFront functions cannot access external resources, so we cannot store JWT token secret in AWS Secrets Manager (or similar) and we cannot access ACM certificates but that isn't really an issue as CloudFront function runtime only supports the following algorithms for HMAC - md5, sha1, or sha256. We'll use sha256 as both md5 and sha1 are insecure. While it is possible to implement more advanced algorithms, the time/resource constraints of CloudFront functions make it all but impossible.
As for key storage, we are left with two options: hardcoding or using CloudFront functions key-value Store (KVS). If protection is deployed for a site where disclosure is not a big deal, hardcoding might be fine. KVS adds a bit more complexity but it makes it very easy to change the key. Note that KVS does not have automatic secrets rotation. We'll use KVS in this example.
CloudFront functions need to be very fast and testing then in console will return percentage of allowed max time. Verifying JWT with the function defined below results in the utilization of 15-20%.
KeyValueStore:
  Type: AWS::CloudFront::KeyValueStore
  Properties:
    Comment: Key value store for storing JWT secret key.
    Name: !Sub "cpa-kvs-${EnvironmentName}"

ExtractAccessCookieCloudfrontFunction:
  Type: AWS::CloudFront::Function
  Properties:
    Name: !Sub "cpa-extract-access-cookie-${EnvironmentName}"
    FunctionConfig:
    Comment: "Extract access cookie from request headers"
    Runtime: cloudfront-js-2.0
    KeyValueStoreAssociations:
      - KeyValueStoreARN: !GetAtt KeyValueStore.Arn
    AutoPublish: true
    FunctionCode: !Sub |
      const crypto = require('crypto');
      import cf from 'cloudfront';

      const kvsId = "${KeyValueStore.Id}";
      const kvsHandle = cf.kvs(kvsId);

      function validateJWTToken(token, key) {
          if (!token) {
              throw new Error('No token supplied');
          }

          const segments = token.split('.');
          if (segments.length !== 3) {
              throw new Error('Not enough or too many segments');
          }

          const headerSeg = segments[0];
          const payloadSeg = segments[1];
          const signatureSeg = segments[2];

          // base64 decode and parse JSON
          const header = JSON.parse(_base64urlDecode(headerSeg));
          const payload = JSON.parse(_base64urlDecode(payloadSeg));

          const signingMethod = 'sha256';
          const signingType = 'hmac';

          const signingInput = [headerSeg, payloadSeg].join('.');

          if (!_verify(signingInput, key, signingMethod, signingType, signatureSeg)) {
              throw new Error('Signature verification failed');
          }

          // Support for nbf and exp claims
          if (payload.nbf && Date.now() < payload.nbf * 1000) {
              throw new Error('Token not yet active');
          }

          if (payload.exp && Date.now() > payload.exp * 1000) {
              throw new Error('Token expired');
          }

          return payload;
      }

      function _compare(a, b) {
          if (a.length != b.length) {
              return false;
          }

          let xor = 0;
          for (let i = 0; i < a.length; i++) {
              xor |= (a.charCodeAt(i) ^ b.charCodeAt(i));
          }

          return 0 === xor;
      }

      function _verify(input, key, method, type, signature) {
          if (type === "hmac") {
              return _compare(signature, _sign(input, key, method));
          } else {
              throw new Error('Algorithm type not recognized');
          }
      }

      function _sign(input, key, method) {
          return crypto.createHmac(method, key).update(input).digest('base64url');
      }

      function _base64urlDecode(str) {
          return Buffer.from(str, 'base64').toString('utf8');
      }

      async function handler(event) {
          const request = event.request;
          const uri = request.uri;

          if (request.cookies["cf-jwt-cookie"]) {
              const token = request.cookies["cf-jwt-cookie"].value;

              try {
                  const secretKey = await kvsHandle.get("JWT_SECRET_KEY");
                  validateJWTToken(token, secretKey);
                  return request;
              } catch (e) {
                  console.log(e);
              }
          }

          if (uri.startsWith('/private-access-login')) {
              if (!uri.includes('.')) {
              request.uri = '/private-access-login/index.html';
              }
              else if (uri === '/private-access-login' || uri === '/private-access-login/') {
                  request.uri = '/private-access-login/index.html';
              }

              return request;
          }

          return {
          statusCode: 302,
          statusDescription: 'Found',
          headers:
              { "location": { "value": "/private-access-login" } }
          };
      }
Visiting the CloudFront site now always returns a 302 with redirect to /auth. However, we can create a JWT manually and include it with the request. Here, we use wt.dev tools to create a JWT with a given secret. Include it with the request, and you should be able to access the site.
To allow users without access to the internal network to access the site, we'll need to create a login page that will send credentials to an endpoint that will return a valid JWT token. This endpoint must be accessible from the public internet. We created a very simple AWS Lambda with a function URL that will have a hardcoded email and password. It will return a JWT with an expiry of 1 week. In a real-world scenario, this should be replaced with a more secure solution unless the exposure of what you are protecting is not critical (e.g., new blog posts or features not yet released).
Here is how the Lambda function looks like:
export const authHandler: Handler = async (event: APIGatewayProxyEvent): Promise<APIGatewayProxyResult> => {
  console.info(`Request to: ${event.path} httpMethod: ${event.httpMethod} body: ${event.body}`);

  try {
    let parsedBody: LoginRequest;

    if (!event.body) {
      return responseService.createBadRequestResponse({ message: "Request body is missing." });
    }

    try {
      parsedBody = JSON.parse(event.body) as LoginRequest;
      validateLoginRequestBody(parsedBody);
    } catch (err) {
      console.error(`Error validating request body: ${err}`);
      return responseService.createBadRequestResponse({ message: "Invalid request body." });
    }

    // Check if email and password are correct
    if (parsedBody.email !== "admin@example.com" || parsedBody.password !== "admin") {
      return responseService.createUnauthorizedResponse({ message: "Invalid email or password." });
    }

    // Create JWT token and return it in the response
    const token = await JWTService.generateJWTToken({
      email: parsedBody.email,
    });

    return responseService.createSuccessResponse({ token });
  } catch (err) {
    console.error(`Error creating success response: ${err}`);
    return responseService.createErrorResponse({ message: "Internal server error." });
  }
};
And here is the CloudFormation template that creates the Lambda function:
PublicApiGateway:
  Type: AWS::Serverless::Api
  Properties:
    StageName: !Ref EnvironmentName
    Cors:
      AllowOrigin: "'*'"
      AllowHeaders: "'*'"
      AllowMethods: "'GET,PUT,POST,DELETE,OPTIONS'"

AwsCrtNodejsLayer:
  Type: AWS::Serverless::LayerVersion
  Properties:
    LayerName: aws-crt-nodejs
    Description: AWS CRT Nodejs layer
    ContentUri: ./layers/aws-crt-nodejs/
    CompatibleRuntimes:
      - nodejs20.x

AuthFunction:
  Type: AWS::Serverless::Function
  Properties:
    Handler: auth.authHandler
    CodeUri: ./src/handlers/
    Runtime: nodejs20.x
    Timeout: 30
    Environment:
      Variables:
        ENVIRONMENT_NAME: !Ref EnvironmentName
        KVS_ARN: !GetAtt KeyValueStore.Arn
        AWS_CRT_NODEJS_BINARY_ABSOLUTE_PATH: /opt/aws-crt-nodejs.node
    Policies:
      - Version: "2012-10-17"
        Statement:
          - Sid: AllowCloudFrontKVStoreAccess
            Action:
              - "cloudfront-keyvaluestore:DescribeKeyValueStore"
              - "cloudfront-keyvaluestore:GetKey"
              - "cloudfront-keyvaluestore:PutKey"
            Effect: Allow
            Resource:
              - !GetAtt KeyValueStore.Arn
    Layers:
      - !Ref AwsCrtNodejsLayer
    Events:
      Api:
        Type: Api
        Properties:
          RestApiId:
            Ref: PublicApiGateway
          Path: /login
          Method: POST
  Metadata:
    BuildMethod: esbuild
    BuildProperties:
      Minify: true
      Target: "es2020"
      Sourcemap: true
      EntryPoints:
        - auth.ts
Note that at the time of writing (July 2024) we had to prepare a custom layer to access the key-value store from a Lambda function using the @aws-sdk/client-cloudfront-keyvaluestore library. This is because the library relies on the aws-crt-nodejs library, which requires native binaries not included by default in the Lambda environment. For more details, you can refer to the current issue on GitHub here. To resolve this, you must install dependencies and move aws-crt-nodejs into ./layers/aws-crt-nodejs:
npm install && mkdir -p layers/aws-crt-nodejs && cp node_modules/aws-crt/dist/bin/linux-x64-glibc/aws-crt-nodejs.node layers/aws-crt-nodejs
To avoid this step you can use our deployment script located at ./scripts/deploy.py.
In the CloudFormation template, we define an AwsCrtNodejsLayer to include the necessary binaries, and the AuthFunction Lambda function is configured to use this layer. The function sets an environment variable AWS_CRT_NODEJS_BINARY_ABSOLUTE_PATH to point to the binary path, ensuring the Lambda can access the required native binaries at runtime.
We use this approach to protect our development version of this site. Feel free to visit https://sand.wt.dev.
Once your protected is set-up, you can test access with curl:
curl $your_cloudfront_url --cookie "cf-jwt-cookie=$generated_jwt_token"
3: Internal network user
When the user with access to the internal network visits the protected site, the login page will send a http request to a resource that is accessible when the user has access to the internal network. In our case, that is a Private REST API gateway in private mode that just returns a valid JWT. The frontend stores the value in the cf-jwt-cookie and can use the SPA until the cookie or JWT token expires (cookie should have the same or shorter expiry than the JWT token).
We will can create a simple REST API Gateway that will return a JWT token. This API Gateway should be in private mode and should be accessible only from the internal network. You can use a VPC Endpoint to make it accessible from other resources.
If you have a VPC that is already set up, you can use the following CloudFormation template to create the API Gateway and VPC Endpoint.
VpcEndpoint:
  Type: AWS::EC2::VPCEndpoint
  Properties:
    ServiceName: !Sub com.amazonaws.${AWS::Region}.execute-api
    PrivateDnsEnabled: true
    SubnetIds:
      - !Ref VPCSubnet
    SecurityGroupIds:
      - !Ref VPCSecurityGroup
    VpcEndpointType: Interface
    VpcId: !Ref VPC

PrivateApiGateway:
  Type: AWS::Serverless::Api
  Properties:
    StageName: !Ref EnvironmentName
    EndpointConfiguration:
      Type: PRIVATE
      VpcEndpointIds:
        - !Ref VpcEndpoint
    Auth:
      ResourcePolicy:
        CustomStatements:
          - Effect: Allow
            Principal: "*"
            Action: execute-api:Invoke
            Resource: arn:aws:execute-api:${AWS::Region}:${AWS::AccountId}:*/*/*/*
          - Effect: Deny
            Principal: "*"
            Action: execute-api:Invoke
            Resource: "arn:aws:execute-api:${AWS::Region}:${AWS::AccountId}:*/*/*/*"
            Condition:
              StringNotEquals:
                aws:SourceVpce: !Ref VpcEndpoint
To obtain the VPC endpoint URL, specify the following in the "Outputs" section of your CloudFormation template:
VpcEndpointUrl:
  Description: "VPC Endpoint URL"
  Value: !Sub "https://${PrivateApiGateway}-${VpcEndpoint}.execute-api.${AWS::Region}.amazonaws.com/${EnvironmentName}/"
To access a private API gateway, users must have access to the internal network by which then routes to VPC Endpoint. This can be done by VPN, site-to-site VPN, Direct connect or may other options. Networking setup must be performed on your side.
To get started without setting up the VPN, you can use our simple reverse proxy lambda. We prepared a simple reverse proxy lambda that allow only whitelisted IPs to access the VPC endpoint. This proxy can be used to simulate restricted access and to ensure that only traffic from permitted IP addresses reaches the API gateway.